RabbitMQ 延时消息的应用与实现

前言

在实际的业务开发中,经常会碰到一些类似定时的任务,比如每天早上 9 点提醒用户业务进度,或者 30 分钟后锁定某个账单之类的操作。类似这样的业务需求,比较古老的操作就是使用各种定时器来实现,然而面对现在的开发更新速度,以及容器化、微服务架构的流行和普及,原本类似 Crontab 这种简单的东西使用起来会有各种限制,比如在最简单的情况你可以使用 Spring@Scheduled 注解来轻松的实现一些定时需求,但现在你可能就需要考虑多如何将定时任务分配给多个节点,某个时间重新构建容器会不会丢失一些定时任务等等一些问题。这种情况延迟消息能解决掉我们大部分的需求,大概的流程就是丢一个消息给中间件,告诉它什么时候投递出去,投递后再由消费端消费(负责去通知/发邮件/发短信)。由于我们公司一直使用的 Spring Cloud 全家桶,RabbitMQ 也已经使用很多年,这里就讲讲如何在Spring Cloud Stream RabbitMQ下以最小的成本实现延时消息,所以在阅读文章时可能需要有 Spring Cloud Stream 相关的基础知识。

实现

概述

实际上 RabbitMQ 的延迟消息是通过 rabbitmq-delayed-message-exchange 这个插件实现的,开启了这个插件之后,只要在 exchange 上定义 x-delayed-message 类型,然后在发送消息的时候 header 带上 x-delay (毫秒数),就可以实现延迟消息。我们可以利用这一特性,来实现消息的延迟/定时发送。

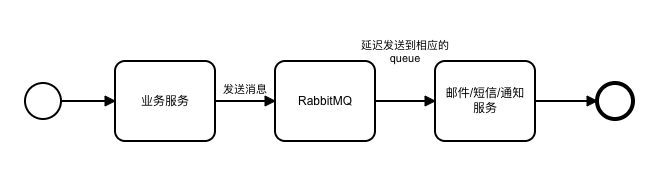
理想的模型是这个样子的,但实际在应用中难免会有一些出入,在文末问题区会做一些相关的讨论。

RabbieMQ 插件安装

由于我们的 RabbitMQ 服务器都是跑在 Docker 容器里,所以这里就相对简单,新建一个 Dockerfile:

1
2
3
4
5
6
7
FROM rabbitmq:3.7.8-management-alpine

RUN cd /plugins \
&& wget https://dl.bintray.com/rabbitmq/community-plugins/3.7.x/rabbitmq_delayed_message_exchange/rabbitmq_delayed_message_exchange-20171201-3.7.x.zip \
&& unzip rabbitmq_delayed_message_exchange-20171201-3.7.x.zip \
&& rm rabbitmq_delayed_message_exchange-20171201-3.7.x.zip \
&& rabbitmq-plugins enable rabbitmq_delayed_message_exchange

如果你使用的是 3.8.x 版本,注意修改对应的版本。另外要是不跑在容器当中,RabbitMQ 官网也有说明,这里就不再赘述。

Sprint Cloud Stream 优化

stream 配置有以下几个问题:

  • 需要在配置中编写 destination 等配置,然而这些配置往往都是模板化的
  • 配置完毕后,代码中还需要将 channel 和 bean 的名称对应上,属于 hard code,如果对不上,或者某一边忘记删除,都会出错

实际上在我们整个微服务的使用来看,大部分的配置内容都是一样的,我们先来看一下比较常见的模板:

1
2
3
4
5
6
7
xxx-events: # 这里是 input
group: yyy-service
contentType: application/json # 新的 stream 版本可以提供默认配置,不用每个指定
durableSubscription: true
yyy-events: # 这里是 output
destination: yyy-events
contentType: application/json # 新的 stream 版本可以提供默认配置,不用每个指定

如果一个 service 以领域事件向外输出消息,那么 RabbitMQ 的模板长成这个样子是比较常见的,统一由 yyy-events 发出领域事件,通过 xxx-events(各种领域)来接收领域事件。这样实际我们只需要根据服务的名称去生成对应的配置即可,如果你自己的业务有所不同,则需要根据自己的使用方式来生成配置。

下面给出实现上述配置的代码:

1
2
3
4
5
6
7
8
9
10
11
12
13
14
15
16
17
18
19
20
21
22
23
24
25
26
27
28
29
30
31
32
33
34
35
36
37
38
39
40
41
42
43
44
45
46
47
48
49
50
51
52
53
54
55
56
57
58
59
60
61
62
63
64
65
66
67
68
69
70
71
72
73
74
75
76
77
78
79
80
81
82
83
84
85
86
87
88
89
90
91
92
93
94
95
96
97
98
99
100
101
102
103
104
105
106
107
108
109
110
111
112
113
114
115
116
117
118
119
120
121
122
123
124
125
126
127
128
129
130
131
132
133
134
135
136
137
138
139
140
@Configuration
@ConditionalOnClass(RabbitServiceAutoConfiguration.class)
public class StreamAutoConfiguration {

@Autowired
private ConfigurableEnvironment environment;

private static final String PROPERTY_SOURCE_NAME = "creams-stream-rabbit-spring-boot-starter:stream-rabbit-config-properties";

private static final String RABBIT_PREFIX = "spring.cloud.stream.rabbit.bindings.";

@Autowired
private ApplicationContext context;


@Bean
@Primary
BindingServiceProperties customProps(BindingServiceProperties bindingServiceProperties) {

Map<String, Object> beanMap = context.getBeansWithAnnotation(EnableBinding.class);

Map<String, Object> map = new HashMap<>();

beanMap.forEach((key, value) -> {
EnableBinding annotation = context.findAnnotationOnBean(key, EnableBinding.class);
if (annotation != null) {
setPropsForAnnotation(annotation, map, bindingServiceProperties);
}
});

addOrReplace(environment.getPropertySources(), map);

return bindingServiceProperties;
}

private void setPropsForAnnotation(EnableBinding annotation, Map<String, Object> map, BindingServiceProperties bindingServiceProperties) {
Stream.of(annotation.value()).forEach(type -> ReflectionUtils.doWithMethods(type, method -> {
Input input = AnnotationUtils.findAnnotation(method, Input.class);
Output output = AnnotationUtils.findAnnotation(method, Output.class);
Destination destination = AnnotationUtils.findAnnotation(method, Destination.class);

String destinationName = Optional.ofNullable(destination).map(Destination::destination).orElse("");
if (input != null) {
// 设置 input 的内容
if (StringUtils.isEmpty(destinationName)) {
destinationName = input.value();
}
String name = BindingBeanDefinitionRegistryUtils
.getBindingTargetName(input, method);
BindingProperties properties = bindingServiceProperties.getBindingProperties(name);
properties.setGroup(getApplicationName());
properties.setDestination(destinationName);
String rabbitPrefix = RABBIT_PREFIX + name + ".consumer";
map.put(rabbitPrefix + ".autoBindDlq", true);
map.put(rabbitPrefix + ".republishToDlq", true);
map.put(rabbitPrefix + ".deadLetterQueueName", getErrorQueueName());
// 如果注解上声明了 isDelayedExchange 为 true,则加上对应的配置
if (Optional.ofNullable(destination).map(Destination::isDelayedExchange).orElse(false)) {
map.put(rabbitPrefix + ".delayedExchange", true);
}
} else if (output != null) {
// 设置 output 的内容
if (StringUtils.isEmpty(destinationName)) {
destinationName = output.value();
}
String name = BindingBeanDefinitionRegistryUtils
.getBindingTargetName(output, method);
BindingProperties properties = bindingServiceProperties.getBindingProperties(name);
properties.setDestination(destinationName);

String rabbitPrefix = RABBIT_PREFIX + name + ".producer";
// 如果注解上声明了 isDelayedExchange 为 true,则加上对应的配置
if (Optional.ofNullable(destination).map(Destination::isDelayedExchange).orElse(false)) {
map.put(rabbitPrefix + ".delayedExchange", true);
}
}
}));
}

private String getApplicationName() {
return environment.getProperty("spring.application.name");
}

// 定义 DLQ 的名称
public String getErrorQueueName() {
return getPureServiceName() + "-error.dlq";
}

// 这里由于我们自己的服务通常起名 creams-xxx-service, 所以会做一次去头去尾的操作,你可以自定义
private String getPureServiceName() {
String[] names = getApplicationName().split("-");
List<String> nameList = new ArrayList<>(Arrays.asList(names));
if (nameList.size() >= 3) {
nameList.remove(0);
nameList.remove(nameList.size() - 1);
}
return String.join("-", nameList);
}

// 添加或者替换 KV
private void addOrReplace(MutablePropertySources propertySources,
Map<String, Object> map) {

MapPropertySource target = null;
if (propertySources.contains(PROPERTY_SOURCE_NAME)) {
PropertySource<?> source = propertySources.get(PROPERTY_SOURCE_NAME);
if (source instanceof MapPropertySource) {
target = (MapPropertySource) source;
for (String key : map.keySet()) {
if (!target.containsProperty(key)) {
target.getSource().put(key, map.get(key));
}
}
}
}
if (target == null) {
target = new MapPropertySource(PROPERTY_SOURCE_NAME, map);
}
if (!propertySources.contains(PROPERTY_SOURCE_NAME)) {
propertySources.addLast(target);
}
}
}

// 提供一个注解,用于自定义一些内容
@Target({ ElementType.FIELD, ElementType.METHOD, ElementType.ANNOTATION_TYPE,
ElementType.PARAMETER })
@Retention(RetentionPolicy.RUNTIME)
@Inherited
@Documented
public @interface Destination {

@AliasFor("destination")
String value() default "";

@AliasFor("value")
String destination() default "";

boolean isDelayedExchange() default false;
}

延迟消息的实现

这里我以实现一个小 Demo 来展示所要实现的东西,这个 Demo 实现发送延迟消息,并自我接收后消费消息。为了节省篇幅,这里略去 Demo 工程的建立以及配置过程,文末将附上地址。

  • 建立输入输出的 interface
1
2
3
4
5
6
7
8
9
10
11
12
13
14
15
16
17
public interface BindingChannelOutput {

String DEMO_EVENTS = "demo-events";

@Output(DEMO_EVENTS)
@Destination(isDelayedExchange = true)
MessageChannel contract();
}

public interface BindingChannelInput {

String DEMO_INPUTS = "demo-events";

@Input(DEMO_INPUTS)
@Destination(isDelayedExchange = true)
SubscribableChannel input();
}

注意这里和一般的 Stream 例子 有一些不一样, 用到了我们之前优化的注解,isDelayedExchange 可以指定为 delay exchange

  • 再建立一个 publisher 用于发送消息,以及一个 Listener 用于接收消息
1
2
3
4
5
6
7
8
9
10
11
12
13
14
15
16
17
18
19
20
21
22
23
24
25
26
27
28
@Component
@AllArgsConstructor
@Slf4j
public class Publisher {

private final BindingChannelOutput outputChannel;

public void send(String content, Long delayMillSeconds) {

MessageBuilder<String> builder = MessageBuilder.withPayload(content);
if (delayMillSeconds > 0) {
builder.setHeader("x-delay", delayMillSeconds);
}
log.info(MessageFormat.format("pushing message [{0}] to remote", content));
outputChannel.output().send(builder.build());
}
}

@Component
@Slf4j
public class Listener {

@StreamListener(BindingChannelInput.DEMO_INPUTS)
public void update(@Payload String test) {
// 发通知/邮件/短信
log.info(MessageFormat.format("received message [{0}]", test));
}
}

启动工程后在 RabbitMQ 的控制台应该可以看到两个 queue ,一个是 demo-events.demo-service 另一个是 demo-service-error.dlq ,这说明我们的配置优化生效了。

  • 写一个接口来测试延迟消息
1
2
3
4
5
6
7
8
9
10
11
12
@RestController
@AllArgsConstructor
public class TestController {

private Publisher publisher;

@PostMapping("/test")
public void test(@RequestParam("content") String content) {

publisher.send(content, 20000L);
}
}

在控制台可以看到打印时间相差 20s

1
2
2020-03-10 17:17:40.691  INFO 77487 --- [nio-8080-exec-5] com.example.demo.Publisher               : pushing message ["测试"] to remote
2020-03-10 17:18:00.483 INFO 77487 --- [.demo-service-1] com.example.demo.Listener : received message ["测试"]

至此延迟消息的实现就完成了,具体到业务的话,都是在消费端进行,比如做一些邮件/短信发送或者通知之类的。

问题&思考

发出去的消息不可查询

当我们的业务服务向 RabbitMQ 发送消息后,RabbitMQ 在没有到时间的时候是看不到的,那么要保证可靠,就需要在业务服务中记录是否投递到 RabbitMQ,可以参考可靠消息的投递,在本地做记录。

延迟时间的限制

文档中提到过延迟的最大毫秒数是 2^32-1 ,大概是 49 天多一点,不过一般也不会往 RabbitMQ 堆这么长时间的消息。一般如果是 1-2 天内需要推送/发通知的业务,我们会直接丢给 RabbitMQ,剩下的比如定了一个一年后的提醒之类的业务,都采用在夜间流量少的时候去查一下第二天需要发送的内容,然后丢到 RabbitMQ 来完成。所以定时之类的操作根据业务的具体情况可能还会存在,但是会大大减少。

禁用插件后所有的未发布的消息会丢失

这个其实还好,一般不会去做这样的操作。

delay exchange 的路由类型

路由类型还是取决于 exchange 本身的类型,由于 Spring Cloud Stream 默认都是 topic 类型,所以这里保持一致。